The new Email to Cabinet feature has been redesigned to be more powerful and easier to use with increased functionality for qualified companies.
Most uses of email to cabinet will involve the upload of one file to one cabinet, as outlined in the instructional email a user will receive when clicking the Get Started icon at the top of your enabled cabinet.

These steps will assist in basic usage and operation of this feature as directed by the instructional email received in a users inbox.

The Simplest Use Case -
- To start, simply reply to the email.
- Attach the document you'd like to upload - as many as you'd like.
- If you'd like to specify the name of the folder the document(s) should go in, enter it as the email's subject line. If you don't specify a folder, folders will be created, named after the document(s).
- If you'd like to add more information about the document(s), like keywords, add it in the body of the email. For an example, see below.
keywords: example, keywords, here
- Make sure you delete any example keywords that you don't use before sending the reply.
However there are several more advanced uses for this feature detailed below:
Multiple files into multiple cabinets-
- Use the email address for an enabled cabinet by clicking the Get Started icon and replying to the instructional email you receive OR by having saved the cabinets email address into your contacts for future use.
- Attach your files, for however many cabinets needed - the files do NOT need to be specific to the cabinets email
- Use the key value pairs in the email body to route your files like so:
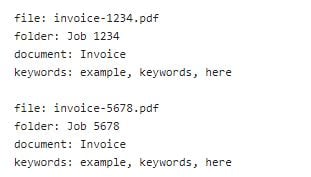
The FILE line MUST come first, this will identify the file for routing. Enter the exact name and file type of your file as indicated.
Use the FOLDER field to identify the desired folder name, only if different from the document name. If the Folder field is not entered, file folders will be named by the file name line.
The DOCUMENT line will name your file something other than its file name, if entered. If not, the file name will post as the document and folder names.
Enter any applicable keywords in the KEYWORDS field, if needed.
Adding a CABINET line into a value pair string for a specific file will route that file into the desired cabinet. This mean you can use the email address of one cabinet to send into several cabinets - just make sure the cabinet name is entered EXACTLY as it appears in your Scan123 company. Not adding a cabinet line will result in the file being sent to the cabinet the email address came from - Enter these value pairs for EACH attached file, with the FILE line first, specify their folder and document names, and the destination cabinet if applicable.
- Send your email. In a few moments, you will receive a confirmation email specifying the routing of all attached files, or generate an error email if there was a complication.
MERGING PDF FILES USING EMAIL TO CABINET
Email to cabinet can now be used to combine multiple .PDF files into a single .PDF. This feature is at this time only available for .PDF files. This can be useful for addendums or car deals. This is possible using the steps outlined above with a few notable differences.
- Begin composing your email using the cabinet email address needed.
- Attach the desired files in need of merging and uploading
- Using the FILE pair value (which must ALWAYS come first) enter the exact name of every attached file to be merged, separated by a comma like so :
file: invoice-5678.pdf, invoice-5679.pdf, invoice-5680.pdf
folder: Job 5678
document: Invoice - Enter your folder name in the FOLDER value field, if none is entered the first attachment will be used for the folder name
- Using the DOCUMENT value field name your merged document, again if no value is entered the name of the FIRST attachment will be used.
- Enter any applicable keywords and cabinet destinations only if different from the originating cabinet email address used to draft this email.
- Hit send!
- Check for your confirmation email
These steps will give you and your business maximum flexibility and control over how to upload your documents.
For further assistance or questions, please consult our Knowledge Base further at https://knowledge.scan123.com